A Doll Come to Life
- Innasya Mackenzie

- Nov 3, 2025
- 5 min read
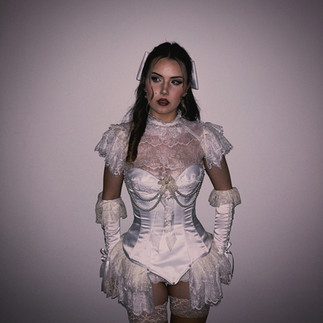
The Porcelain Doll: A Handmade Halloween Dream
Hauntingly beautiful was my theme this Halloween. Firstly, through the Innasya Attire Hauntingly Beautiful Halloween Lookbook, that was born from my love of turning fantasy into fashion and included one-of-a-kind, couture-inspired costumes that are as unique as they are stunning. And, secondly through my Halloween costume that I designed and made with the help of my Mum; The Haunted Porcelain Doll.


The Inspiration:
The inspiration behind my porcelain doll costume is much deeper than simply the aesthetic. In my story, it's symbolises self love and acceptance. It's been almost a year since I put down the fake tan and fell in love with my natural skin tone. Seeing as 2025 is my first Halloween embracing my pale complexion it felt only fitting that my Halloween look would reflect the journey I’ve been on - one of self-love, acceptance, and finding beauty in authenticity.
I used to say that if I ever stopped tanning, I’d want my skin to look like porcelain - soft, flawless, luminous. So this Halloween, I became the porcelain doll I’d always imagined.

When it comes to designing anything, my creative process always starts with creating a Pinterest board full of ideas and among them, there are always certain pins that feel especially inspiring.

The Doll
The first porcelain doll I saved to this board.
Porcelain dolls originated in Germany and France in the 1800s and were made to look like the women of the time. Making porcelain dolls is considered an art form as many hours, material, and labour go into the creation of each doll. Built from biscuit porcelain or glazed porcelain they are considered fragile, delicate, and beautiful.

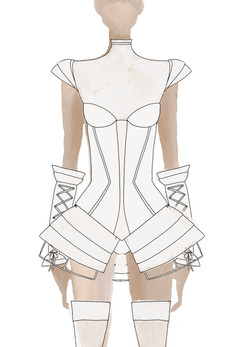
The Structure, Silhouette, and Design
After coming across this photo I instantly fell in love
with the structure and silhouette of this design.
The corset, the layered lace skirt, but mostly the figure the design created. An accentuated hip to aid in making the waist appear smaller was one of the features my design included, inspired by this garment.

The Lace Top
The garment that you saw me create actually was not the first design I drew. My original illustration included an off the shoulder, puff sleeve look which I loved until this photo popped up on my Pinterest feed and I knew I had to create something inspired by it.
With my background in personal styling I have a strong understanding of my body shape and the garments that flatter me best. Not only is this concept gorgeous but I knew it would be perfect for my figure.

The Arm Cuffs
The way that these embody the 'Hauntingly Beautiful' aesthetic had me drawn to them instantly. I think they were the perfect addition to my costume and completed the look effortlessly.
While I never like to copy any design, I will say my cuffs turned out pretty similar to the inspiration photo because I seriously had no notes. We added additional laces and layers to make it a little more my own and tie it in with the corset I designed.
The Creation Process:
In the past when mum has helped me bring my designs to life I mostly just give her my design and let her do her thing but for this one, I wanted to be a little bit more involved.


So, I was very much the intern and doing all of the 'grunt work' I guess you could say, but that's all part and parcel of learning right? With the best teacher guiding me through every step, I learnt so much and had a ball. I am forever grateful for my mums talents, expertises, and willingness to share her knowledge with me.


Step 1: Cutting out the pattern & creating the sample
Seeing as this is a custom design we had to create a custom pattern. We picked up a corset and skirt pattern from Spotlight, made the corset out of an old bedsheet and then altered the pattern to fit my design.
With mums instruction I sewed most of this corset together myself.

Step 2: Sewing together the corset
Now that the sample's done, it's time to get started on the real thing. My corset contains 4 layers. 2 of satin, 1 of interfacing, and the lining. I was in charge of cutting everything out, pressing the garment, and pinning layers together while mum sewed everything as it had to be perfect and I trust her many years of experience over my few.
To lace the corset at the back we added eyelets which dad assisted in banging them in with the hammer and making sure they were secure.

Step 3: The Lace Top
This part I can proudly say I did pretty much all by myself! We used one of my fitted t-shirts as the pattern for this part of the design. Mum cut it out for me and I sewed it all together.
After assembling the top I popped it onto our mannequin, Seraphina, and started pinning the ruffle sleeves. I hand sewed them in place and glued a few pearls along the shoulder seam.

Step 4: Sewing on the skirt
The skirt that is attached to the corset consists of 4 layers of lace. The bottom 3 being the same lace we used for the lace top. I cut out each layer of lace, gathered them, and then mum sewed them together and attached them to the skirt. Originally the bottom layer of lace was longer but after trying it on we decided to cut it shorter.

Step 5: Time to Decorate
In my illustration I didn't add any embellishments, or decorations. I wanted to wait until I had the corset made and in front of me to play around and decide how I wanted to decorate the garment.
We were on a little bit of a time crunch so I pinned and threaded the beads and mum came and sewed it all on for me while I was getting ready.


Everything about this design was intentional including the mix of ivory & white throughout the garment. I styled the look with the Honey Birdette Ivory Amour Lace Sheer Stay Ups which are, of course, Ivory. So to keep the look cohesive I added little touches of ivory in the lace, ruffles, pearls, and bows. I love the vintage / old feel it gives to the design.
The Glam
I absolutely adore creating themed makeup looks and this look was no different. I followed similar steps to my Bratz doll makeup tutorial, rounded my eyes, and drew on the iconic doll like lips. I also added a few beauty spots for that vintage makeup feel.

For my hair I used the TYMO CurlPro Plus, and didn't brush out the curls in order to create the perfect ringlets, just like a dolls.
I am over the moon with how the design came out. It's everything I dreamed and more!


Comments